

Are you eager to learn how to resolve the error message "There has been a huge problem on your website"?
A severe issue on your website, sometimes known as the "White Screen of Death," is one of the most common mistakes WordPress website owners encounter.
It may also be referred to by phrases such as "There has been a critical problem on your website" on the Elementor website or "There has been a major mistake on your website" in XAMP.
WordPress is unable to provide any details on the error's cause. Troubleshooting is made simpler with access to the WordPress administrative area.
This article aims to explain the cause of the "There Has Been a Major Problem on Your Website" error that occurs on your website and how to use several different techniques to resolve it.
The "There Has Been a Major Problem on Your Website" Error: What Causes It?
WordPress's most well-known error message is the "White Screen of Death," and if you've been using it for a time, you've either heard of it or encountered it.
This bizarre bug made the page blank and white, affecting the entire site and potentially your backend.
There was a significant mistake with your site, and WordPress recently replaced the blank screen with an error notice and the following content. For further details, check your admin email inbox.
This is less concerning than a page load error. However, it should provide more details to determine what caused this critical mistake.
The error is often brought on by a PHP problem or a PHP-related problem, such as when your RAM limit is exceeded or when a plugin, piece of code, or theme has an error. This could also happen if the database shows signs of corruption.
Troubleshooting is made much simpler by the information you discover, albeit the error message may need to be more informative.
The "There Has Been a Major Problem on Your Website" Error: How Can I Repair It?
The reason you are here will assist in getting your website up and running effectively. To do this, we've gathered a variety of solutions to the issue.
These actions can include modifying the WordPress core file if PHP is the source of the problem.
Creating a backup of your website is advised before using these tactics. By implementing these suggestions, we hope to prevent further damage.
It would be helpful if you could access the server hosting your website. Since your site is down, you'll need access to the site through FTP and SFTP.
Please get in touch with your web hosting company if you need assistance seeing your FTP credentials on your web host's dashboard. Installing an FTP client like FileZilla is also necessary.
Many solutions to this "There Has Been a Major Problem on Your Website" issue are provided in this area.
Step 1: Activate WordPress debugging and review error logs
Turning on debugging should be your first step if WordPress is giving you trouble.
While using debug mode, your website will display many PHP faults that may be utilized to identify the origin of the problem.
You must activate your debug log if you can't access your dashboard. It keeps track of all PHP errors.
After you've found the error's cause, you may search your website or audit your log to look into your website. To prevent users from seeing the error, debugging must be stopped as soon as it is finished.
To activate debugging on your own or to open the log debugging, follow these steps:
Join FTP to your website.
Open wp-config.php using a text editor or an IDE by looking for it in the root folder.
Before the content in your document, insert the following code.
define( 'WP_DEBUG', true );define( 'WP_DEBUG_DISPLAY', false );define( 'WP_DEBUG_LOG', true );
After the code is inserted, close the file and save it.
Any issues will be noted in a log file, and your website is now ready for debugging. The debug.log file is placed in the WP-content subdirectory in the debug.log directory.
Locate the name of the plugin or theme that is creating the issue, or look for a specific file inside the plugin or theme.
Even if you are still trying to figure out what to do with the information, it is still crucial to keep it. If you need to contact someone soon, you can utilize it.
When you finish fixing the problem, remove these lines of code.
Step 2: Turn off every plugin
A plugin could cause this critical error. If your site has dozens or more plugins, it could be challenging to pinpoint the one that's causing the problem.
But, there is a simple way to identify the offending plugin: turn the plugins off and check whether the issue is resolved.
After then, it's crucial to give them each a turn until they stop and pinpoint the issue's origin.
To delete your plugins from your dashboard, follow these steps:
Go to the Plugins section in WordPress Dashboard.
Then choose Installed Plugins.
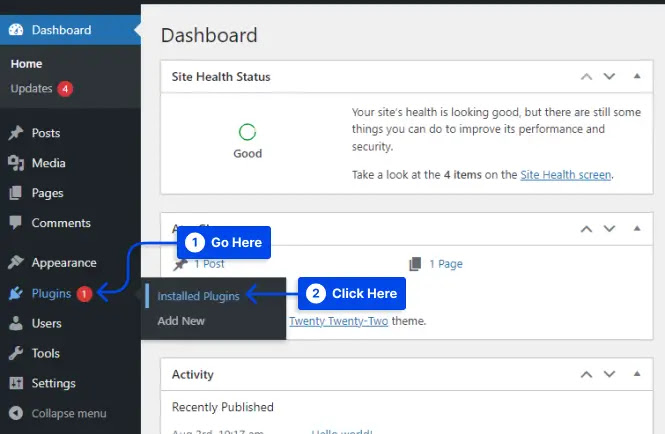
Go to Plugins on your WordPress dashboard, then click the Plugins you installed. Plugins
Select the checkbox at the highest of the page to choose from the list.

Click the checkbox at the
end of your list to pick the ones you like best.
Go to Bulk Actions, Click Bulk Actions, and then deactivate.
Click the Apply button.

Click Bulk Actions and click Deactivate the feature and click Apply.
This will likely solve any issues and bring your website back to normal.
You can also choose the delete button to eliminate all of their files. In this instance, installing these files by hand or restoring backups made previously is required.
You can turn them on one at a time by returning to the Plugins you have installed and then clicking on Activateon to locate the plugin causing the error.
If you'd like to accomplish similar things via FTP, it is possible to do it using these instructions:
Log into your website using FTP.
Visit the WordPress-Content folder to locate your plugins.
Change the name of the plugins folder into the plugins-old folder and confirm whether your site is running again.
Change the name of the folder and change it to the plugins.
The plugins are likely to remain disabled, which allows users to log in to your account and enable each plugin separately.
You must rename each folder for plugins using the suffix _old until your site has been restored if the plugins restart automatically.
Method 3: Revert to a Default Theme
Sometimes, an issue within your theme creates this crucial error. Check for this by deleting the music briefly and then returning to your piece of choice. That should resolve the problem.
Note Before making any modifications, create a backup of your website in case you require a method to retrieve the theme's files after they've been deleted. Your styling could only be recovered if restarting the music.
Take these steps to remove your theme:
Click the Appearance tab in Your WordPress account.
Click Themes.

In your WordPress dashboard, select Appearance, then choose Themes.
Please choose the problem-solving subject.

Please choose the
appropriate theme you want to select it.
Select the delete option in the lower-right area of your pop-up.

In the pop-up window's bottom right corner, choose Delete.
You can download and switch themes if you can't see this option. The most suited option would be the regular theme.
Unless you have access to the dashboard, To reset FTP settings to defaults, adhere to the following steps:
Use FTP to connect to your website.
Please visit wp-content/themes.
You can either alter the name of the folder you wish to use, turn it back on, or delete it.
Place the backup files or the most current default theme in the themes folder.
Now your website should be visible with the chosen theme. If the theme loads correctly directly, the problem is probably connected to it.
Reinstalling themes or renaming the folder after its original name are two ways to regain your theme's files.
Method 4: Expand Text Processing Capacity and Max Upload File Size
Even if you only see your problem sometimes and not on every page, slightly modifying a few PHP functions might lessen its severity.
While attempting to upload a huge file, you can get an error screen if the upload size limit is inadequate. Nevertheless, the issue might be resolved by raising the backtrack and recursion limitations.
The upload limit on your account must then be compared to the file size you want to upload.
Use these steps to establish your account's maximum upload size:
Visit the media.
Choose "Add New from the menu.

Go to Media and click on
the Add New option.
Look under the uploader for
files.

Be careful to check the file name after the uploader's
To solve the issue, do the following:
Connect to FTP.
Open the wp-config.php file by going there.
To raise the maximum upload size of your file, add the following code above the last comment line:
ini_set('upload_max_size' , '256M' );ini_set('post_max_size','256M');
4.
Use this code to repair the brokenness of big pages that are on
your website:
ini_set('pcre.recursion_limit',20000000);ini_set('pcre.backtrack_limit',10000000);Method 5: Increase PHP Memory Limit
In many instances it is in many cases, the PHP limits on memory are often responsible for the problem regardless of whether a theme or plugin triggers it.
The amount of RAM or memory on your server is limited. WordPress has a limit on how much memory is allocated for the PHP script.
If the limit is reached, then you could see the black screen as well as it could display the "There Has Been a Critical Error on Your Website" error message.
Although you don't need to set your memory limit to an excessively high amount to allow improperly configured scripts to cause your website, the default settings could be far too low.
A slight rise in PHP limits might be enough to resolve your website's issues quickly. Use these guidelines to achieve this:
Visit your website using FTP and start wp-config.php.
Just before the last line, to save it:
define( 'WP_MEMORY_LIMIT', '128M' );
Alternatively, you can
consider 256M if it doesn't solve the issue. However, it is only necessary to
go further if it is specifically suggested in the manual.
Some hosts have low memory
limits and do not allow you to increase these limits if you ask for them. In
this situation, it is possible to resolve the issue by changing to a more
reliable hosting service.
Method 6: Clear Your Site Cache
Caching your site has many
benefits, and it's usually an excellent thing.
But, in some cases, the
cache may be damaged and cause your site to perform differently than it should.
This could result in displaying the "There Has Been a Critical Error on
Your Website" error.
This issue can be resolved
by clearing the cache to fix and bring the site back to normal operation.
There is no need to be
worried. The cached versions of your pages will be restored and fully
functional, and your site will run faster. Your cache only needs to be cleared
when the corrupted files are eliminated.
There are different
methods of clearing the cache of your website. It is possible to utilize the plugin option, or it
is suggested that you read the host's documentation, and they will be able to give
you specific instructions.
Method 7: Upgrade Your PHP Version
In most cases, the outdated
version of PHP could cause your site to fail, and various issues are more
likely to arise, such as a "There Has Been a Critical Error on Your
Website" error.
In general, you must ensure
that your website runs on the most current version of PHP. It is a standard
usage in the past for WordPress users to use PHP 7.4 to prevent conflict with
plugins and themes.
In most instances, this
shouldn't be an issue; however, if you use PHP 5. x or higher, you'll be
required to upgrade since it could cause major issues.
If you are conducting a PHP
upgrade, it is recommended to make sure you have a backup of your data before
proceeding.
The steps for upgrading
your PHP version depend on your hosting provider. Refer to your hosting
provider's documentation to update to the latest PHP version.
Method 8: Restore WordPress Backup
You can restore the backup
of your WordPress website in the event of WordPress problems.
Although this might only
solve the issue in some cases, it's worth a try. If the issue continues, you
can pinpoint the steps you made to trigger the issue.
The process of restoring a
website is dependent on the kind of backup you create. If you've used an
application, make sure you adhered to its instructions.
You should be able to back
up through your hosting account when backups are part of your hosting plan.
Try your restoration using a test website before
restoring your live website to ensure that it works as intended and that you're
not overwriting existing work.
Conclusion
This article is designed to
clarify the reason behind the error message "There Has Been a Critical
Error on Your Website" on your site and how to get rid of the error with
various strategies.
We are delighted that you took the time to review this article. In the comments section, you can leave any questions or suggestions.