
Are you experiencing the "Error for Site Owner Invalid Domain for Site Key" issue troublesome? This article will explain the "Error for Site Owner Invalid Domain for Site Key" and offers six possible solutions.

Do you want to know how to solve this "Error for Site Owner Invalid Domain for Site Key" error? A lovely day is suddenly painful when you cannot access the WordPress Dashboard due to this error message.
Furthermore, you're dissatisfied because you require help in finding the solution to the issue.
In this article, we will clarify what the "Error for Site Owner Invalid Domain for Site Key" error means and provide six methods that can resolve it.
What is "Error for Site Owner Invalid Domain for Site Key"?
This issue usually occurs when you copy or migrate your site to a different domain. However, you do not modify the site Key and the Secret Key for your Login NoCaptcha plugin for the new location or provide the new domain's address on the Google ReCaptcha page.
So, your brand-new domain can't be accessed via the WordPress dashboard. Instead, you will receive an Error text "Error for Site Owner Invalid Domain for Site Key."
How to Fix "Error for Site Owner Invalid Domain for Site Key"?
There are times when you might encounter an "error for site owner invalid key type" error. What's the root cause of this problem?
There are two primary reasons for this issue - the wrong kind of ReCaptcha and the problem with its DNS name.
Following this in the next section, we will look at how to solve that "error for site owner Invalid domain for site key" problem using six strategies.
Method 1: Downgrade to ReCaptcha V2 Key
The most well-known web frameworks do not work with V3 keys. Therefore, your first step to resolve this "error for site owner invalid key type" problem is upgrading to Recaptcha V2 keys.
Follow these steps to do this:
Visit the dashboard of your WordPress Dashboard.
Select the Contact Form 7 and Integrations Remove from the API keys.
Go to the Plugins and select the "Add New" option.

Click on Plugins, then click on the Add New button.
Install, search and enable the Invisible reCaptcha plugin for the WordPress plugin.
Visit your ReCaptcha Admin account.
Choose ReCaptcha v2 (Invisible) and create new keys. After you have completed the form, you will be provided with a site and secret key.
Copy the key of the website onto the clipboard.
Visit Settings on your WordPress dashboard.
Select the Invisible ReCaptcha option.
Copy and paste the Site Key you copied earlier into the Site Key field.
Re-copy this Key to the Secret Key.
Copy your Secret Key into the Secret Key field.
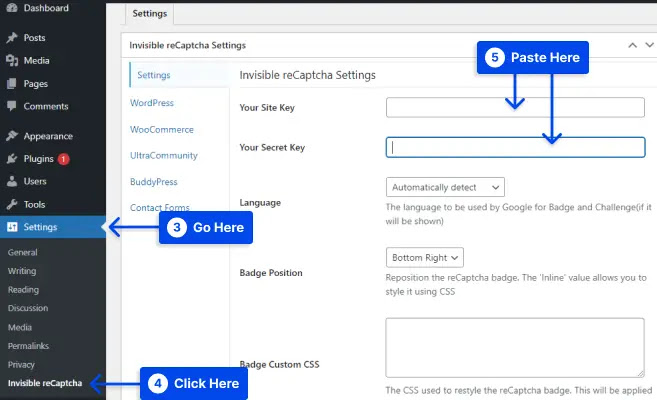
Click on Settings in your WordPress dashboard, click the Invisible ReCaptcha option, and paste the site and secret Keys.
Select the Save Changes option to save the changes.

Click the Save Changes option to save the changes
Visit and click on the Contact Forms tab.
Check the option to enable the Security for Contact Form 7. option.
Select the option to save the changes option.

Click on the tab for Contact Forms. Check for the Enable Security for Contact Form 7 option, and then click Save Changes.
Method 2: Reinstall the Plugin and Add Your Site to Google Recaptcha
If you are using this Login-No-Captcha ReCaptcha plugin, you must first log into your cPanel of your site and then open the file manager and edit the settings.
Follow these steps to accomplish this:
Log into the website of your CPanel.
Start the file management.
Choose your public_html folder.
Go to the folder wp_content. Folder.
Select your plugins folder and then the Login Recaptc folder.
Choose all files from the Login Recaptc folder and eliminate them.
Go to the login page for WP to determine whether the issue has been solved.
If your site is functioning, the error is now corrected. You should be able to log in to your WordPress dashboard, though the issue was resolved by uninstalling the plugin.
Ultimately, your site is experiencing a new issue; you must reinstall the plugin and register an additional domain to safeguard your website from hackers and other threats.
Follow these steps to accomplish this:
Visit Your WordPress Dashboard.
Go to the plugins and Click on the "Add New" option.
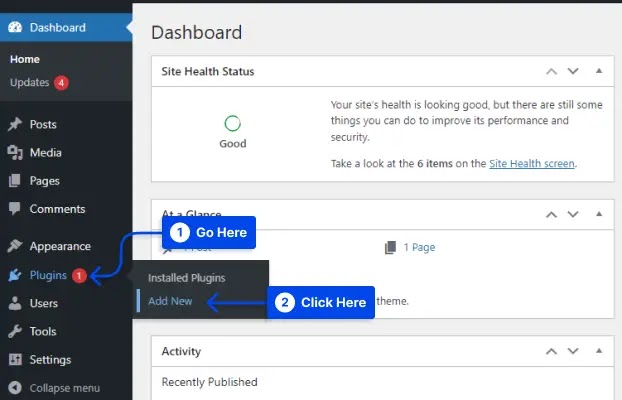
Navigate to Plugins and click on the Add New option.
Install, search, install, activate, and activate the Login-No Captcha ReCaptcha plugin.
Navigate to Settings and select Login captcha.
Click on the Click Here link to generate the site Key and security for Google Nocaptcha.

Go to Settings. Click on Settings, then click Login NoCaptcha Click on the link.
Visit this google Recaptcha webpage and fill in the form with the label of your website's Domain name, and reCaptcha fill in the state.
Make sure you check the box below, Accept the terms of service of reCaptcha and then click the Submit button.
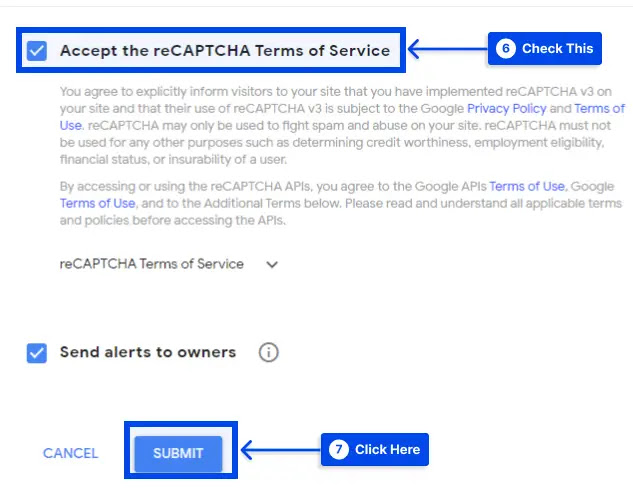
Click on the box next to accept the reCaptcha terms and conditions of service, and then click the Submit button.
You will receive a Website Key and a Security Key to your site when you click on the Submit button.
These keys should be copied and pasted on your plugin's settings pages.
Click the Save Changes button to save your settings.

These keys must be copied and then pasted onto the page for your plugin's settings. Then click the Save Changes button.
Log in to your account, and you'll see that the Google ReCaptcha security method has been implemented to protect your site.
Method 3: Verify Domain Name
It is essential to verify that your site exists and is using precisely the same name as that registered for ReCaptcha and is listed within the section on domain names on Google's Google ReCaptcha page.
This can be verified through these procedures:
Choose the plugins. Click Plugins, select Plugins, and then settings under the WP-ReCaptcha options.
Enter the site key as well as the secret key.
Select to save ReCaptcha to save the changes.
Method 4: Edit and Update Settings in the Database
If the site administrator must also activate this option when login into the site and encountering an error similar to the one above, you will need to make some adjustments to the database.
In this case, it is only necessary to disable this option. But make sure you have backed up your data before you proceed.
Follow these steps to do this:
The following command should be run in the database to deactivate this verification number:
style='background:#F9F9F9;border:none;so-border-alt:solid #E4E7EC .5pt; padding:0in;so-padding-alt:9.0pt 6.0pt 9.0pt 6.0pt;box-sizing: border-box; margin-bottom:1rem;border-radius: 3px;font-variant-ligatures: normal; font-variant-caps: normal;orphans: 2;widows: 2;-webkit-text-stroke-width: 0px; text-decoration-thickness: initial;text-decoration-style: initial;text-decoration-color: initial; overflow:auto;word-spacing:0px'>style='color:#212529'>Update configuration SET value ='' where setting ='CaptchaSetting'; style='font-size:8.5pt;color:#212529'>
Check that the " error for site owner Invalid domain for site key" is solved.
Method 5: Deleting the domain Name Validation. Determine the source of the reCAPTCHA method.
Follow these steps to apply this method:
Go to https://www.domain.com/recaptcha/admin
Just click to go to the URL.
Click on your crucial setting at the lower.
They removed the option to disable the Domain Name Validation. Verify the whereabouts of the reCAPTCHA service.
Click Save, and the captcha will begin working.
Method 6: Contact Support
If none of these methods works, take a look at calling support. It is recommended that you wait until receiving your response before taking the advice given by customer support. Check to see if you have resolved the "error for site owner invalid key type" issue is solved.
Conclusion
In this post, we've outlined what causes the "Error for Site Owner Invalid Domain for Site Key reCaptcha" error and have provided six solutions to fix it.
We're delighted to introduce you to this article. We thank you took the time to go through it. Feel free to post any feedback or suggestions in the comment section.